
Homeowners have a lot on their plates, especially when seasons change. Preventing crawl space moisture issues this spring should be on the top of your list! It’s easy to overlook your crawl space during winter months, because it isn’t a place you see or visit often. However, once temperatures rise and spring rains start, even small issues can escalate into major headaches—think mold, mildew, or wood rot. By taking a proactive approach now you’ll be better prepared for the more humid months ahead.

Why Spring Is Crucial for Crawl Space Preparation
Winter conditions can mask hidden crawl space problems. Lower humidity and cooler temperatures may mean moisture issues are not as apparent. However, as soon as snow starts melting or spring rains pick up, and humidity levels increase any unnoticed issues can quickly worsen. By inspecting and preparing in early spring, you’ll catch small problems before they become expensive repairs.
Protect Indoor Air Quality
According to the EPA, a significant portion of the air inside your home can flow up from the crawl space. If that air is damp, musty, or full of mold spores, it affects your entire living area. Taking preventive action in the spring ensures your home remains comfortable and healthy as we move into warmer, more humid months.
Seasonal Moisture Risks: Winter to Spring
Even in regions without harsh winters, the transition to spring often brings:
- Freeze-Thaw Cycles
In colder climates, the repeated freezing and thawing of the soil can cause cracks or openings along your foundation. Once temperatures rise, ground water may seep into these gaps and cracks. - Heavy Rainfall
Spring storms are notorious for dumping large amounts of rain. If your gutters are full or downspouts are misdirected, or landscaping can’t handle the runoff, water can pool around the foundation and infiltrate the crawl space. - Rising Humidity
Warmer air holds more moisture. That increased humidity can condense on cooler surfaces in the crawl space, leading to mold, mildew, and potential damage to wooden joists or insulation.
By recognizing these seasonal factors, you’ll know precisely where to focus your spring inspections and repairs. However, water intrusion must be addressed through proper drainage or waterproofing while moisture is addressed by a moisture control solution.
Crawl Space Inspection:
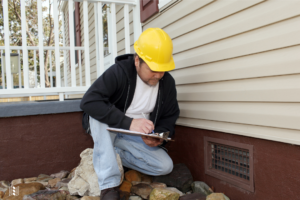
Before jumping into repairs, perform a thorough inspection. If space is tight or you suspect serious structural problems, consider hiring a professional inspector.
Look for the following that may indicate issues that need to be addressed:
- Standing Water or Damp Ground
- Pools of water may signal a water issue. Water issues and moisture issues are two different problems. However, where there is water, there is moisture.
- Damp soil, even if not fully flooded, can foreshadow bigger moisture problems when spring arrives.
- Mold or Mildew
- Musty smells or discolored patches on wood, insulation, or plastic may indicate mold growth.
- Mold thrives in damp conditions and can spread quickly once humidity rises.
- Damaged Insulation
- Wet or sagging insulation loses its effectiveness and may harbor mold or pests.
- Inspect the material’s integrity and note any spots needing replacement.
- Foundation Cracks
- Even hairline cracks may allow moisture seepage and require attention.
- Keep track of crack size or spreading over time and consider a professional to evaluate and repair foundation issues.
- Efflorescence
- Efflorescence is a white, chalky residue that appears in crawl spaces in areas where there has been water intrusion.
- The white substance is soluble salts within the material being carried to the surface by water.
- Vapor Barrier Condition
- If you have a vapor barrier, check for rips, tears, or areas where it’s pulled away from the walls.
- A compromised barrier can allow ground moisture to rise into the crawl space.
- Pest Activity
- Look for droppings, nests, or chewed materials.
- Moist environments often attract insects and rodents, which can exacerbate damage.
Having a clear record of areas needing attention will make it easier to prioritize repairs and communicate with professionals if needed.
Preventative Maintenance Tasks
Armed with the insights from your inspection, it’s time to roll up your sleeves and get to work.
Exterior Drainage
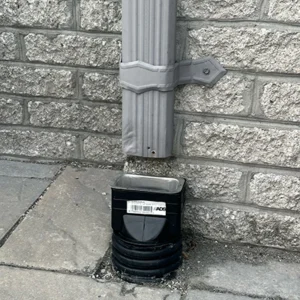
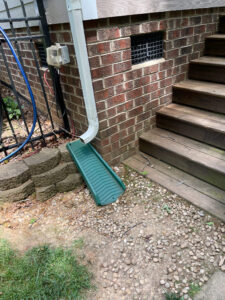
- Clean Gutters & Downspouts
Clogged gutters lead to water overflowing near the foundation which can seep into your crawl space. Make sure they’re free of leaves and debris. - Downspouts
If downspouts are misdirected, reroute to drain away from the foundation to prevent water problems in your crawl space. Downspout extenders can direct water several feet away from the foundation, reducing seepage risks. - Regrade Landscaping
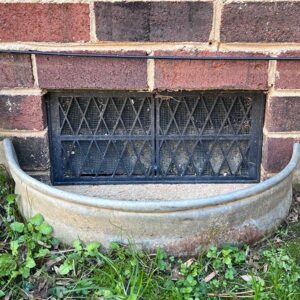
Ensure the ground around your home slopes away from the foundation. If grading is done improperly, this may allow water to enter your crawl space. - Vent Wells Clean vent wells of debris. Leaves, grass clippings, or debris can accumulate in the well, leading to blockages and moisture buildup. Check the integrity of the vent cover/screen; repair any damage that allows rodents or insects to enter.
Seal & Repair
- Foundation Cracks
Correct small cracks, however, larger ones may require a professional’s eye to ensure they’re not indicative of structural concerns. - Vapor Barrier Patching
Replace ineffective vapor barriers that are torn. Call a professional to ensure vapor barrier is installed correctly.
Insulation Checks
- Replace Damaged Sections
Replace any insulation that’s moldy or wet. If left in place, it can compromise its effectiveness.
Moisture Control & Monitoring
Once water issues arise in the crawl space, evaporation will inevitably raise moisture levels in the air. Managing that increased moisture is crucial. However, one thing to keep in mind is that even if you don’t have a noticeable water intrusion issue, moisture levels in the crawl space can still rise. Managing moisture is vital to preserving the structural integrity and overall health of your crawl space.
- Humidity
- Ensure humidity levels are within appropriate range. Levels that are too high may need to be addressed to prevent moisture issues.
- Moisture Control
- Consider a moisture control system to prevent moisture within your crawl space.
Laying the Groundwork for Spring
Now that you’ve handled the essential groundwork, there’s still more to do. This spring will be time to kick off a thorough “spring cleaning” routine for your crawl space—clearing out debris, fine-tuning moisture control systems, and taking a closer look at any lingering cold-weather damage. This two-step approach ensures you tackle urgent moisture concerns right away, while setting the stage for a drier, healthier home throughout the season.
By following these guidelines, you’ll help protect your home’s structural integrity, maintain better indoor air quality, and avoid the frantic scramble to fix last-minute moisture problems. This is the perfect window to ensure your crawl space—and the rest of your home—remains comfortable and well-protected in the months ahead.
